


How to Clean up photos in photoshop
How to Clean Up Photo in Photoshop- If you want to clean up your photos in Photoshop, you’re in luck. Photoshop users have many different techniques to remove photo backgrounds from photos. For simple backgrounds, select backgrounds and remove them with a standard magic wand tool. For a more complex background, you can use the background removal tool.
Clean photo in Photoshop with the Background Eraser Tool
The background tool removes the color in the center of the brush, then removes pixels that are the same color that you ‘painted’. It is not difficult to master the tool. I will show you how it works.
Clean an Image Background, Step 1: Open The Image
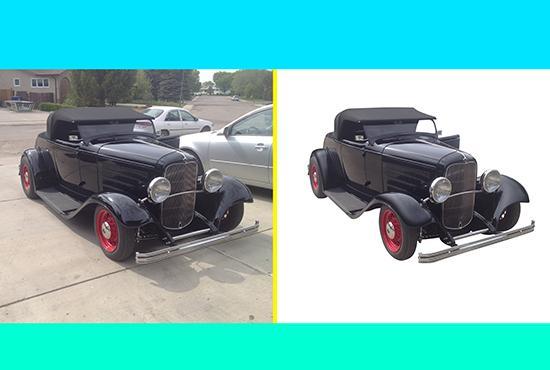
Start by taking the photo you want to stand out from the background. I’ll be using the photo below as it easily shows areas from storage to more viable areas. I installed it for free on Unsplash.
Clean Up a Photo Background, Step 2: Select Background Eraser Tool
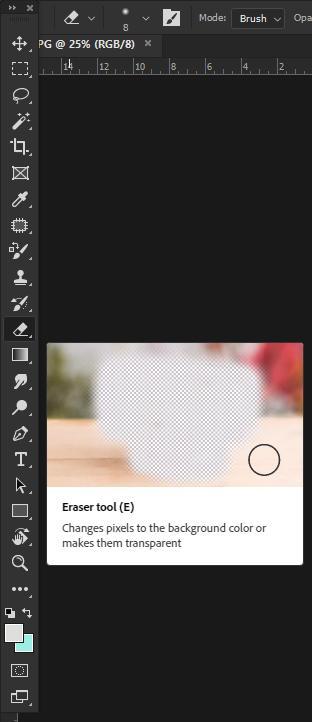
Select the Background Eraser tool from Photoshop. It can be hidden under the eraser. If so, click and hold the Eraser tool to display it. You can also press Shift + E to cycle through all the erasers and access the background bands. If you select the standard Eraser tool, press Shift + E twice to select the Background Graph tool.
Clean the Photo Background, Step 3: Select effective limit and sampling settings
Although you can start with low endurance, the cleaner can still remove unwanted Background Like This Image.
For foreground areas that share a background color (like this one), you may need to set Sampling and Limits. In this photo, I switch to the Sampling: One-time option by setting my limit on Pause and setting my tolerance to 5%.
Sampling: If you have the chance, the color below the waist of the hair is only taken when you click and the swatch is not taken as you move the comb. The Non-adjacent Edges option removes all pixels that match the spot color you want to remove. It is very convenient, for example, to switch from one strand to another without removing them.
The background removal tool you will probably need to complete the task. But if not, read on.
Related Articles –
Fastest Cleanup photo background and remove the background on photoshop
How to Remove Unwanted and White Background
How Touch-Up and Clean Product in Photoshop
Photoshop has great potential for enhancing photos in some way. Even small improvements can significantly change the end result. Whether you’re interested in repacking photos or professionally editing photos for clients, Photoshop can get the job done.

This is a collection of tutorials by category that will show you some new tricks for editing photos. You’ll find guides on working with skin, eyes, teeth, nose, hair, body, color, lighting, and more.
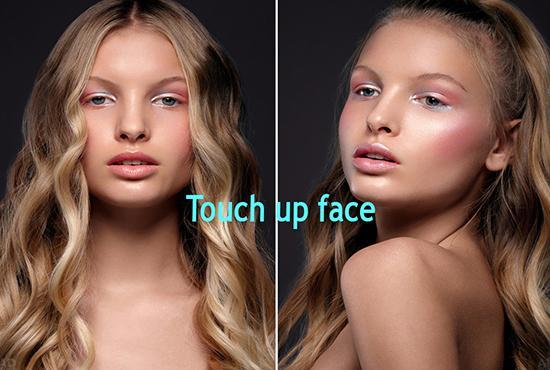
How to Touch Up Skin in Photoshop
The skin is undoubtedly the most difficult aspect of the portrait to manipulate. Switching skin too much can make someone look wrong. To maintain realistic texture when editing skins, you need to understand how Photoshop tools work on skins.
How to Clean Up Photo in Photoshop- Learning to change and manage skin textures in Photoshop is critical to successful portrait editing. The most popular digital retouch tools are the Quick Healing Brush and the Healing Brush tool.
When using the dot recovery brush, you generally select an area of the photo that Photoshop uses to replace nearby pixels. That’s why Spot Healing Brush relies on Photoshop’s ingenuity to detect and replace pixels.
The Healing Brush is similar to the Print Clone tool in that the user has to select an area to paint on an unwanted area.
Related Articles –
soften the skin and remove the curse in Photoshop
How to Remove Skin Blemishes in Photoshop 2021?
Easiest Ways To Smooth Skin in Adobe Photoshop
A great number of people want their skin to look smooth and even in photos. Hence, knowing how to edit skins naturally in Photoshop is a skill that almost any photographer can use.
The easiest way to touch the skin, including removing scars and acne, is with a healing brush. This tool shortens the skin adaptation process with just one click of the mouse. After the location of the image is selected, Photoshop decodes and adjusts pixels next to the surrounding pixels.
If the Point Concealer Brush doesn’t replace all the blurred pixels, such as when removing a tattoo, try using the Clone Stamp tool or the Repair Brush tool.
Both tools have comparable capabilities when used as a printing press. Select a location on the photo and drag it to another location. This process is one of the easiest and most effective methods of smoothing skin in Photoshop.
You can also consider using Photoshop Elements to change the cover of your photo. This program is easier to use by beginners because it is basically a sleek and streamlined version of the complete Photoshop program.
How to smooth edges in Photoshop
Smooth Edges Photoshop plays an important role in Photoshop editing services. After smoothing the edges you will see dramatic changes in the image. By the way, are you looking for a way to follow the boundaries of Photoshop? I share the perfect instruction from a smooth, fresh edge on a complex background. Smooth edges are an essential part of creating composite images, product images, or magazine photos. I also share secret tips for avoiding rough edges
Make Selection
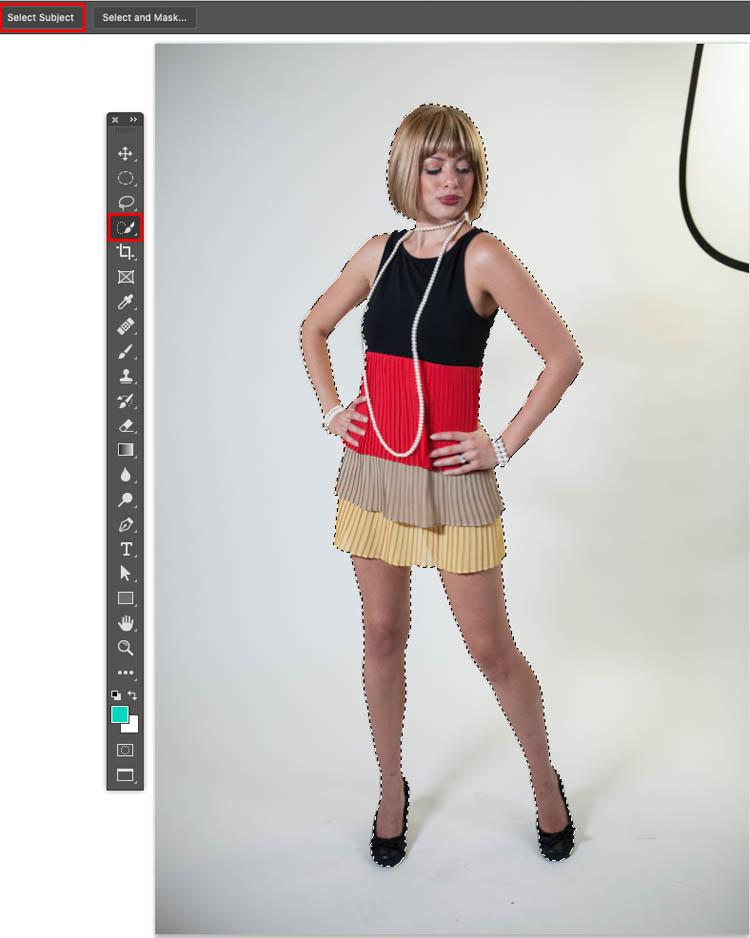
Make selections around objects. On CC2019 or later (we use Photoshop 2020 here), select the shortcut tool and click Select Subject. In previous versions of Photoshop, make selections around objects with quick options, magic wands, or whatever.
Select Channels Panel
Select channel panel from the toolbar on photoshop
Create a new Channel
Choose the channel with the most contrast. (Blue Channel) Click on “Blue”
Contract Selection
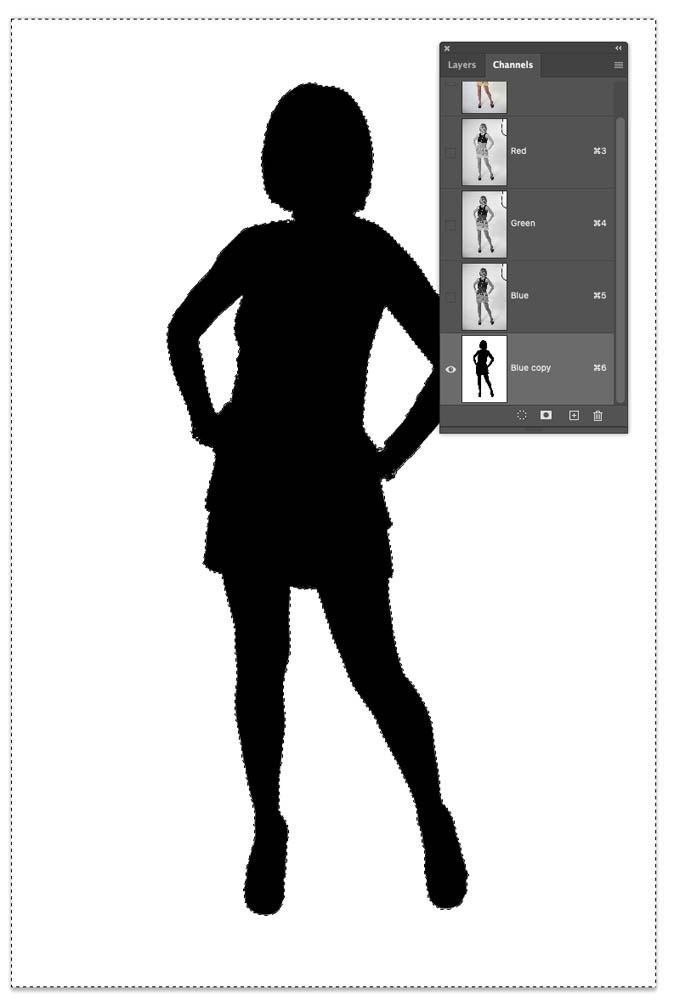
Select Select> Modify> Contract and enter 10-15 pixels
Fill Selection
Fill in the selection with black. Press the D button to reset the color. Alt / Option + Delete the field with the foreground color.
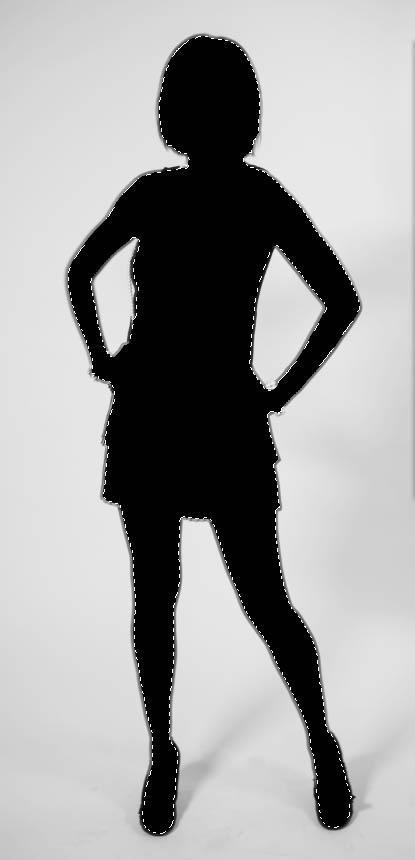
Replace Fill Color
Hold down Alt / Option and click the new layer mask button.
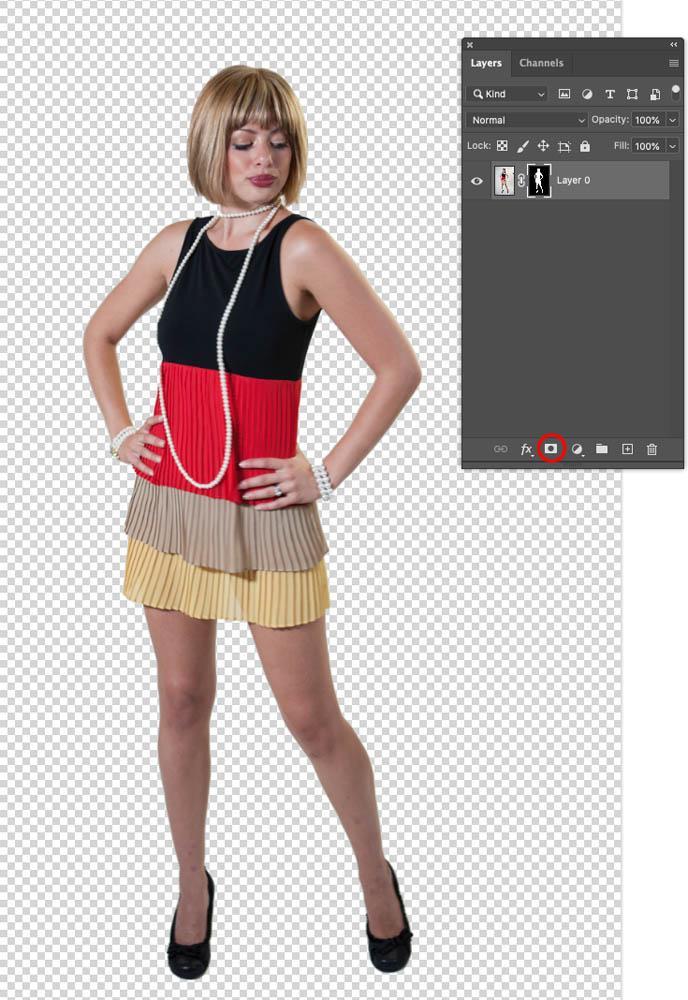
You will get a nice cut. You can touch it by painting it in black or white on the layer mask.
Read More-
Cutout product photography in Photoshop
How to create glare product photography photoshop white background
How To Choose A Convenient Photo Editing Services Company